Table of Contents
Toggle5 Powerful Tips to Free Up Hidden Storage and Disk Space on Your Mac
5 Powerful Tips to Free Up Hidden Storage . If you’ve noticed your Mac slowing down or getting notifications about running out of storage, it’s likely time for a deep cleanup. Even though offloading data to external drives or cloud storage can help, many users prefer to keep data on their devices for easy access. Here’s a complete guide to freeing up storage space on your Mac, with five powerful tips to reveal hidden files and remove clutter from your system. Let’s dive into effective, easy ways to regain precious space on your Mac!
1. Use Finder’s Hidden Tools to Organize and Delete Large Files

Finder is an essential tool for navigating files on your Mac, but you might not realize that it has features perfect for quickly identifying and removing large files. Although newer macOS versions have removed the “All Files” view, you can use the “Recents” folder as a starting point for a customized file overview.
- Sort by Size: Open Finder, then select “Recents” and switch to the “Size” sorting view (located under the six-square icon). This lets you easily spot large files that may not be essential, like old downloads or backups you no longer need.
- Browse Key Folders: Manually check “Downloads,” “Documents,” and “Desktop,” as these folders often house big files. Also, look in your “Movies” and “Music” folders since media files can be especially storage-hungry.
This approach is quick and straightforward, giving you a high-level view of your largest files so you can decide what to keep and what to trash.
5 Powerful Tips to Free Up Hidden Storage
2. Manage Storage with macOS System Settings
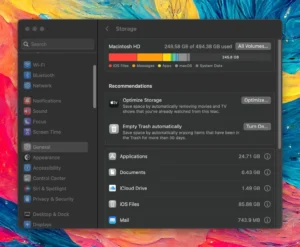
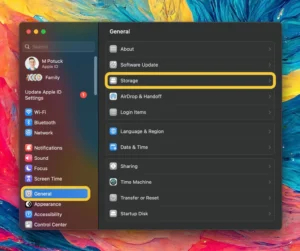
macOS has a built-in storage management tool that gives you insights into what’s occupying disk space. This tool, located in System Settings, provides storage recommendations and a breakdown of different categories.
- Access Storage Settings: Open System Settings > General > Storage. You’ll see a visual bar at the top showing how much space categories like Documents, Apps, and Photos are consuming.
- Use Recommended Cleanup Options: The tool may suggest actions like Optimize Storage (for deleting old TV shows or movies), Store in iCloud, Empty Trash Automatically, and Reduce Clutter. These can help free up space without requiring much effort.
- View Applications’ Usage: Below the recommendations, you’ll see a list of your applications, with details on each app’s storage usage. Click the “i” on the right for more specifics on data use or to remove unneeded apps and files.
Unfortunately, macOS doesn’t let you access or delete files from the “System” and “Other” categories here, which is why our next tip will help you dig even deeper.
5 Powerful Tips to Free Up Hidden Storage
3. Discover Hidden Space with Daisy Disk
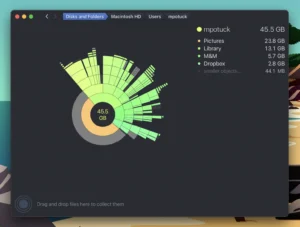
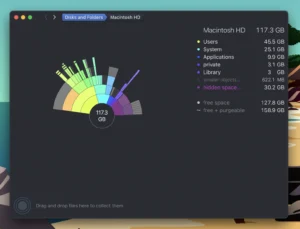
For users wanting more advanced insights into their storage, Daisy Disk is a powerful tool worth considering. This app offers an interactive, visual disk analyzer that lets you see what’s really taking up space on your Mac, including hidden and temporary files that aren’t easily accessible through Finder or System Settings.
- Visual Storage Breakdown: Daisy Disk’s colorful and intuitive interface makes it easy to spot large files and folders at a glance, even showing you purgeable and temporary files.
- Direct Deletion: You can delete files directly within Daisy Disk, simplifying the cleanup process.
- Affordable, Lifetime License: Daisy Disk costs $9.99 for a lifetime license, which makes it a cost-effective option if you’re someone who likes to clean up storage every few months.
This tool is excellent for uncovering large hidden files, like Time Machine’s local backup cache, which can sometimes consume gigabytes of storage. Daisy Disk has become a favorite for many Mac users due to its powerful, simple-to-use design.
5 Powerful Tips to Free Up Hidden Storage
4. Try CleanMyMac X and Sensei for Extra Cleanup Tools
For those who want comprehensive maintenance tools beyond storage cleanup, CleanMyMac X and Sensei are two excellent options that offer a full range of utilities. While neither offers as detailed of a storage analysis as Daisy Disk, they both excel at scanning for junk files, removing unused applications, and optimizing performance.
- CleanMyMac X: This tool specializes in locating purgeable files, caches, and even system junk that can be safely deleted. It also includes a malware removal tool, a shredder for securely deleting files, and an app manager for easy removal of unwanted applications.
- Sensei: Sensei goes a step further, adding hardware and performance monitoring tools. It offers a storage manager and uninstall utility, but it’s also designed to give you a real-time overview of your Mac’s performance, making it a great choice for power users.
CleanMyMac X costs $39.99 annually, while Sensei’s subscription is $29 annually, with lifetime licenses available for both. Both tools offer free trials, so you can test them before committing to a purchase.
5 Powerful Tips to Free Up Hidden Storage
5. Clear System Junk, Caches, and Hidden Files


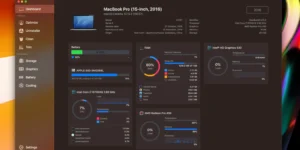
A major culprit of hidden storage on your Mac is system junk, like cache files, old application data, and browser history. While some of these are essential for speeding up processes, others are unnecessary clutter.
- Clear Browser Cache: Safari, Chrome, and other browsers accumulate cached files over time. To clear Safari’s cache, go to Safari > Settings > Privacy > Manage Website Data, and clear unnecessary data.
- Delete System Cache: Go to Finder > Go to Folder… (or press Shift + Command + G), type
~/Library/Caches, and delete files in this folder. Be careful to only remove cache files and not any other system files. - Remove Old Time Machine Snapshots: Time Machine stores local snapshots on your Mac, especially when external drives aren’t available. To clear these, open Terminal and type
tmutil listlocalsnapshots /to view snapshots, then usetmutil deletelocalsnapshots [date]to delete them.
Additionally, if you want to automate this process, tools like CleanMyMac X can make it safer and easier by handling system junk cleanup in one click.
Final Thoughts: Keep Your Mac Running Smoothly
Regularly cleaning up your Mac can keep it running smoothly and extend its lifespan, making it an essential part of digital maintenance. While Finder and macOS tools offer quick ways to tidy up, more advanced tools like Daisy Disk, CleanMyMac X, and Sensei can help reveal hidden files and optimize your Mac’s performance.
To recap, here’s a summary of the five powerful tips:
- Use Finder’s tools to sort and delete large files in key folders.
- Take advantage of System Settings for macOS storage management recommendations.
- Discover hidden files and large folders with Daisy Disk’s visual storage analysis.
- Optimize storage and performance using CleanMyMac X and Sensei.
- Clear system junk, browser caches, and local Time Machine snapshots for extra space.
By implementing these strategies, you’ll regain space and improve your Mac’s performance, making it faster and more responsive. Regularly applying these tips ensures that your Mac remains clutter-free, with storage optimized for your needs. Enjoy a cleaner, faster Mac that’s ready for whatever you throw at it?
