Transitioning Between Clips with Ease A VideoStar Tutorial for Beginners
Transitioning Between Clips with Ease A VideoStar– Transitions are an essential element of video editing that can make your content more engaging and professional. Whether you’re making TikTok videos, YouTube clips, or personal projects, learning how to create smooth transitions between clips will elevate your editing skills. In this guide, we’ll walk you through the process of creating seamless transitions in the popular iOS app, VideoStar, so you can produce captivating videos with ease.
VideoStar is an app that has grown immensely popular among content creators because of its user-friendly features and powerful editing tools. One of its standout features is the ability to create transitions between clips effortlessly. Transitions can turn raw footage into a polished and engaging sequence, holding your viewer’s attention from start to finish. In this guide, we’ll explore how to make transitions using VideoStar’s basic features, perfect for beginners who want to level up their video editing game.
Transitioning Between Clips with Ease A VideoStar
Step 1: Setting Up Your Project in VideoStar
The first step in creating seamless transitions in VideoStar is setting up your project correctly. Open the VideoStar app, and select the option to create a new project. You’ll need to import the clips you want to edit. Choose your videos from your camera roll, then select the frame rate and resolution best suited to your project. For smoother transitions, aim for a higher frame rate—30 frames per second (fps) or above is ideal.
Once your clips are in place, you’re ready to start adding transitions.
Step 2: Choosing the Right Transition
VideoStar offers a wide variety of transition effects, from simple fades to more complex options like zooms, slides, and spins. When selecting a transition, think about the tone and flow of your video. For example, a slow fade might work best for a calm, emotional moment, while a zoom or spin transition can add energy to a fast-paced section.
To add a transition, follow these steps:
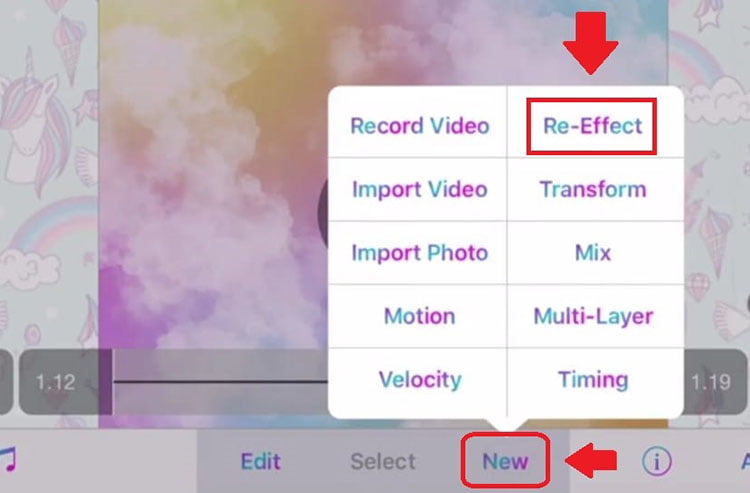
- Tap on the “Edit” button located in the timeline.
- Select the clip where you want the transition to start.
- Choose “New” and then tap on “Re-Effect.”
- Browse the effects library and select a transition that suits your style.
Once you’ve chosen a transition effect, apply it to your clip. VideoStar makes it easy to preview how your transition looks, so don’t hesitate to experiment until you find the perfect fit.
Transitioning Between Clips with Ease A VideoStar
Step 3: Fine-Tuning Your Transitions
After you’ve applied a transition, it’s time to fine-tune it to make it as smooth as possible. VideoStar’s keyframe functionality allows you to control every aspect of the transition, from the speed of the effect to the position and scale of your clips.
Here’s how to fine-tune a transition using keyframes:
- Tap on the “Keyframes” option at the bottom of the screen.
- Set a keyframe at the beginning of the transition and adjust the clip’s position, rotation, or scale.
- Add another keyframe at the end of the transition and adjust the final values accordingly.
The keyframes will dictate how the transition progresses between the start and end points. The more precise you are with your keyframes, the smoother your transition will be.
Transitioning Between Clips with Ease A VideoStar
Step 4: Syncing Transitions with Music
Music is an essential part of video editing, and syncing your transitions with the beat of your soundtrack can make a huge difference in how your video is perceived. VideoStar makes this process easy, allowing you to match transitions to music beats effortlessly.
To sync transitions with music:
- Import your audio file or select a song from the VideoStar library.
- Use the waveform of the song to identify key beats where transitions should occur.
- Adjust the timing of your clips and transitions so they align with the beats in the music.
This method will make your transitions feel natural and flow seamlessly with your audio, keeping your viewers engaged.
Transitioning Between Clips with Ease A VideoStar
Step 5: Previewing and Exporting Your Video
Before finalizing your project, it’s important to preview your video to ensure that all transitions look smooth and are perfectly timed. Tap on the “Play” button to see a full preview of your edited video. If any transitions feel jarring or out of place, go back to the timeline and make adjustments.
Once you’re satisfied with your transitions, it’s time to export your video. VideoStar offers multiple export settings, including resolution and frame rate options. For high-quality video, choose the highest resolution and frame rate your device supports. After exporting, you can share your video directly on social media or save it to your device for later use.
Creating seamless transitions in VideoStar may seem challenging at first, but with a bit of practice, you’ll find it becomes second nature. Transitions are a powerful way to elevate your video content, making it more polished and engaging. By following these steps, even beginners can create professional-level edits using VideoStar’s intuitive tools. So grab your clips, get creative with transitions, and start editing like a pro!
