Effortless Contact Groups on iPhone: Simplify Messaging to Many
Setting up a contact group on your iPhone is one of those small but powerful tricks that can save you a lot of time. Instead of messaging each friend, family member, or colleague individually, Apple’s contact groups let you organize your contacts into groups for easy mass messaging. Whether it’s a group chat with friends, quick updates to family, or team announcements, iPhone contact groups can simplify communication in a few steps. The best part? With iOS 16 or later, you can do it directly on your device, no extra apps or software needed.
In this guide, we’ll show you how to create contact groups on your iPhone, how to send a group message, and how to manage your groups by removing or deleting contacts.
What You’ll Need
- An iPhone running iOS 16 or later
- An iCloud account
Creating a Contact Group on Your iPhone
Creating a new contact group is straightforward. With just a few steps, you can have your group ready to go:
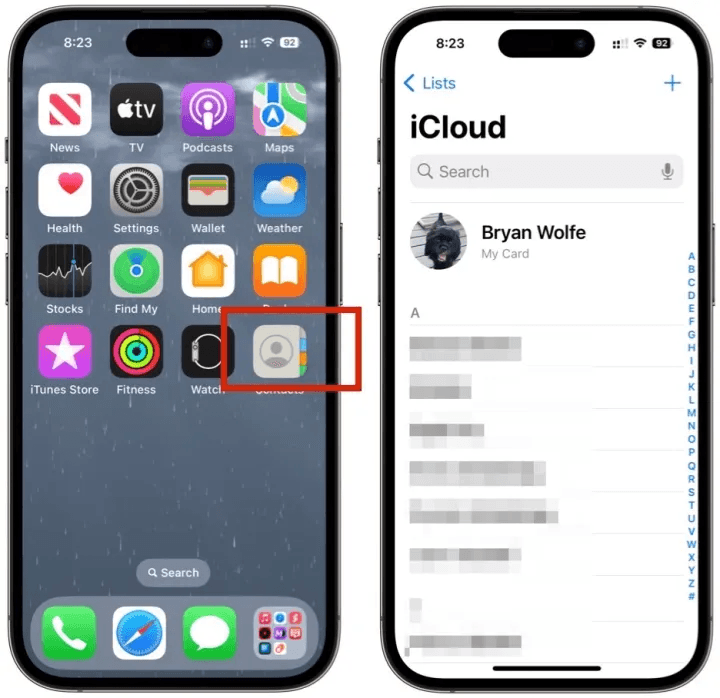
Step 1: Access the Contacts App
Effortless Contact Groups on iPhone
From your iPhone’s Home screen:
- Tap the Contacts app. Alternatively, you can open the Phone app and select Contacts at the bottom.
- Once inside, find the Lists option at the top left and tap it. This is where you can organize and manage your contact groups.
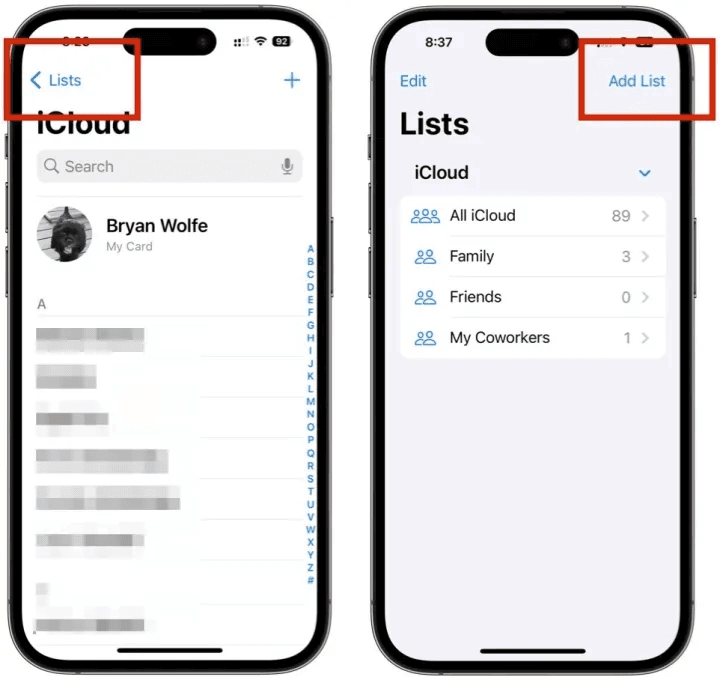
Step 2: Add a New List
Effortless Contact Groups on iPhone
- Tap Add List at the top right corner. This creates a new category for your group.
- In the List Name field, type a unique name for your group (e.g., “Family,” “Work Team,” “Friends”).
- Tap Add List again to finalize the name. You’ll now see your new list on the Lists page.
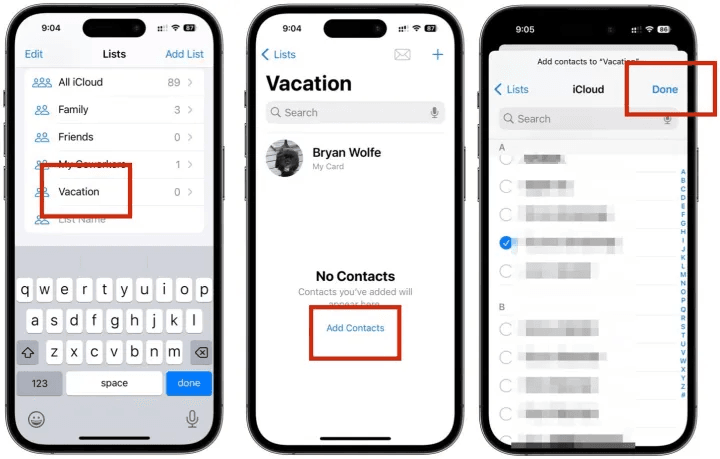
Step 3: Add Contacts to Your New Group

- Select the list you just created.
- Tap Add Contacts and choose each contact you want to add to the group.
- Once you’ve selected everyone, tap Done in the top right corner. Your contact group is now ready for group messaging.
Effortless Contact Groups on iPhone
Sending a Message to Your Contact Group
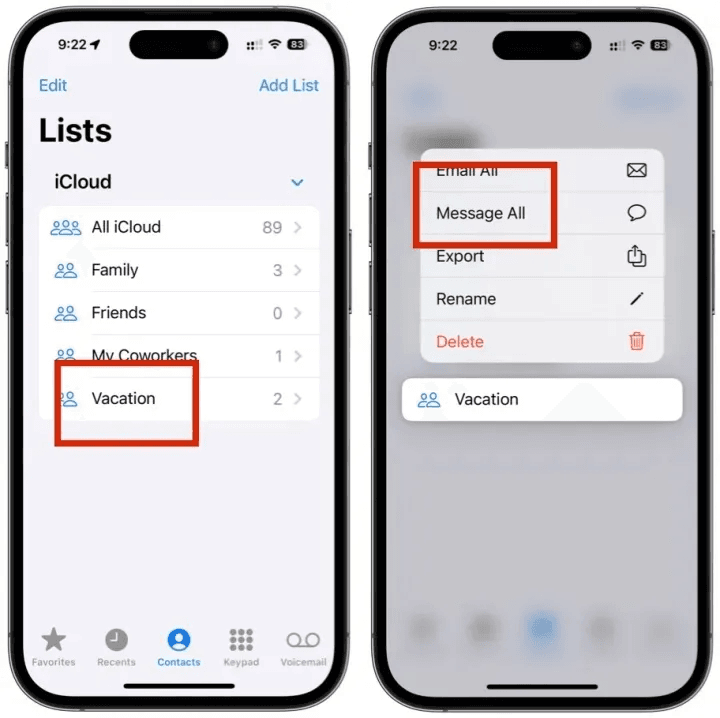
With your group in place, here’s how to send a message to everyone in it:
- Go back to the Lists page in the Contacts app.
- Long press on the list you want to message.
- Select Message All. You’ll be taken to the Messages app with your group pre-loaded, so you can send a message just as you would to an individual contact.
By using contact groups, you can send one message to multiple people at once, streamlining your communication and saving time.
Removing Contacts from Your Group
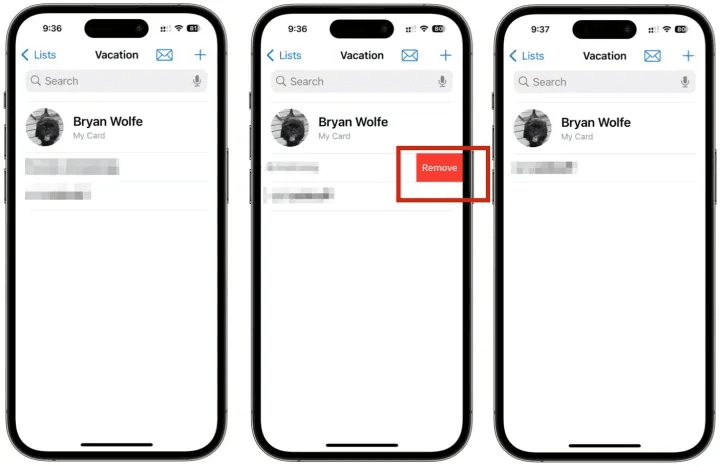
Sometimes you may need to update your groups, whether it’s to remove a contact or reorganize. Here’s how to remove a contact from an existing group:
- Open the Contacts app, then tap on the group from which you want to remove someone.
- Find the contact you wish to remove and swipe left on their name.
- Tap Remove. This will delete them from the group, but not from your main contact list.
By managing your groups this way, you can keep them relevant and up-to-date with minimal hassle.
Deleting a Contact Group on Your iPhone
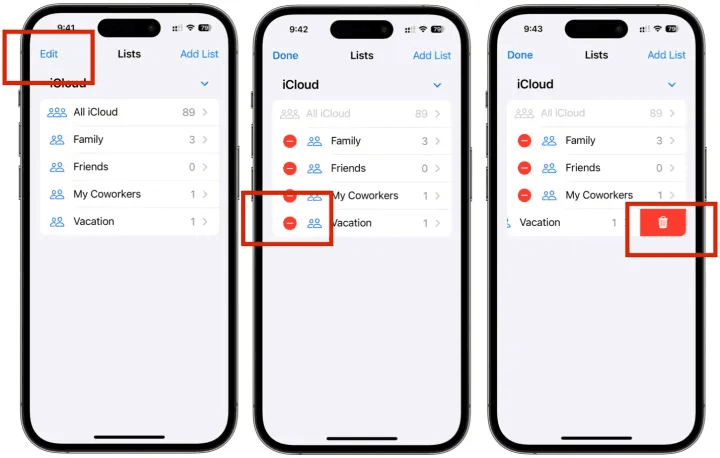
If a group is no longer needed, you can easily delete it. Here’s how:
- In the Contacts app, go to the Lists page.
- Tap Edit in the top left corner.
- Tap the red minus icon next to the list you wish to delete, then confirm by tapping the red trash icon. This action will delete the entire contact group, but your individual contacts will remain in your contact list.
Deleting groups you no longer use keeps your Contacts app organized and relevant.
Benefits of Using Contact Groups
1. Streamlined Communication
Contact groups enable you to send one message to multiple recipients, making it easier to share updates, announcements, or reminders. This is especially helpful for families, social circles, and work teams.
2. Time Efficiency
Instead of selecting each contact every time you want to send a message, you can pre-organize contacts into groups. Once you set up a group, messaging takes just a few taps.
3. Personalized Control
With groups, you have control over who gets what information. Easily organize contacts by context—work, family, or friends—so your messages always go to the right audience.
4. Easy Updates
When you need to add or remove someone from a group, it’s easy to do so. Just update the group as necessary, and the next message you send will reflect the changes.
FAQ: Common Questions About Contact Groups
Can I create more than one contact group?
Yes, there’s no limit to the number of contact groups you can create on your iPhone, so feel free to set up groups for different purposes.
Will deleting a contact group delete my contacts?
No, deleting a contact group only removes the group itself. The individual contacts within that group remain in your main contact list.
Can I rename a contact group?
Yes, you can rename a contact group by going to the Lists page, selecting Edit, and tapping on the group name to make changes.
New Messaging Options in iOS 17
If you’re using iOS 17 or later, Apple has also enhanced the Messages app, adding more customization options, such as:
- Custom Stickers: iOS 17 introduces custom iMessage stickers, letting you add a personal touch to your group messages.
- Editing and Unsending Messages: If you make a mistake, you can edit or unsend messages after they’re sent.
- Message Filters: You can now filter unknown senders for a cleaner inbox, keeping your messages organized and reducing unwanted clutter.
These features, combined with contact groups, make for an intuitive, flexible messaging experience on iPhone.
Effortless Contact Groups on iPhone
Effortless Contact Groups on iPhone
Effortless Contact Groups on iPhone
